
With a hull drawing do an IOM or RG 65 hull is very easy if we use balsa wood.
The hull drawing have normally three views: bodyplan, profile and plan view.

Normally to do the hull we need only two: profile and bodyplan.

bodyplan
In this figure we have only one side draw and we need do the other side, normally the bodyplan comes with the two sides already drawn. An other work to do in the bodyplan is take away the planking thickness. Some body plans comes with two lines for each section that signifies the planking thickness, as do in Noux, according your planking thickness you chose what bodyplan you will use:

Noux - Click in figure as it change, to zoom and see the two lines
The bodyplan is a view of each hull cross section. We use each line to do a section in paper that we will glue in the wood, see:

Each line from bodyplan gives one transverse section
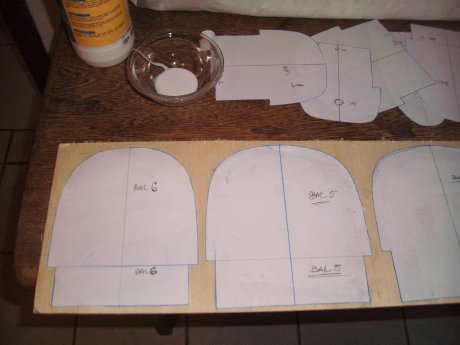

After glue the sections we easy can cut each hull section and mounting in a wood base.
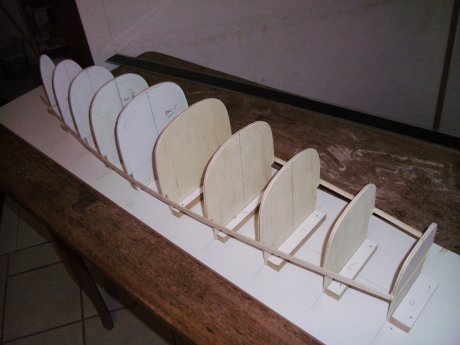
You see in the wood base the marks to hold the sections in his right place.
If you do the hull shell in balsa is better do the transverse sections also in balsa, to achieve a light construction, but you can also do the transverse sections in others light wood or plywood but ever thinking in a lightweight hull principally if you are think in competition.
In these photos the transverse section is in thicker plywood because this is a plug to do a fiberglass mold and so the weight is not important.
To mark the wood base we need the profile informations:
 Profile
In this figure we have the position of each station and we can mark them in the wood base.
When hold the station in wood base we need put the forward sections, forward mark line and the after sections after mark line. We can see this looking to the sections that all have the paper with the station aimed for the middle of the boat.
This proceedings is to enable bevel the wood station to support the shell planking.
If you will do a plug for do a fiberglass mold you can use depron to build the stations like my friend Mauro that do a Rogue an RG 65 by this manner:

depron stations

depron stations

depron stations

depron stations
A beautiful Noob photos construction sequence was done by Andy Hoffmann : http://rg-andy.blogspot.com/
https://picasaweb.google.com/116060872368656981042/N00B?gsessionid=sl6YqDySdmOiO1F7LNl7zg
Andy kindly permitted publish it here:

Noob - lines plan


IN CONSTRUCTION –> continue –> and can change something.
.
LINKS
We have in others sites beautiful works explaining how to build a hull:
theamya.org/boats/us1m/pdf/us1mmistral.pdf
——————————————————————————
THE BULB
To make a bulb we have some ways:
Professional – RC Yacht Tech – http://rcyachttech.webs.com/
RC Yacht Tech manufactures fittings and custom plugs & moulds for RC yachts using CNC machining technology.


Bulb mold
Amateur – without much experience and patient
The bulb need be made with wood (normally) to use it to do a blaster mold that will receive the molten lead.
The wood bulb should be done with the help of templates or lathe to look like designed .
To determine the shape of the bulb, we can use the bulb calculator software:
The Bulb Calculator can be download here:
http://www.onemetre.net/Design/Bulbcalc/bulbcalc.zip
With the bulb weight and the profile wanted the software give all measures
You can see how to use the Bulb Calculator here:
http://www.onemetre.net/Design/Bulbcalc/Bulbcalc.htm

Balsa bulb
Box to receive the blaster:

Inferior bulb part molded – Wax all surface to do the superior part and put more blaster
 The top part is done

Next we need do channels in the surfaces of the mold to the air escape when we put the melted lead. The next photos you will see a more elaborated blaster mold. The above photos is only to illustrate that anyone can melt the lead and do a bulb. Naturally a bulb done with this mold will need more finish with polyester or epoxy putty. But it solves.
Here we have a wooden bulb photo from Anderswallin.net done on a lathe:
http://www.anderswallin.net/2006/03/building-a-wooden-noux/#more-53

In this link from rcgroups.com we can see a bulb casting photos:
http://www.rcgroups.com/forums/showthread.php?t=1031842&page=9
Amateur with great skill and patience
The next photos are published in the forum RCNetwork.de in this thread:
http://www.rc-network.de/forum/showthread.php/25815-Bau-einer-IOM-quot-ARROW-quot/page11
This thread is excellent for learning all stages of construction. I suggest reading it all 🙂 , at least the part of the bulb casting, an excellent work done by the forum participant TIGA (Rainer).
Doing the wood bulb


Box for blaster

The wood bulb positioned in the under box

The under box filled with blaster

The result


The channels to air scape

The bigger channel is for melted lead, the brass bar is for strengthen the lead


In these photos we see a problem, normally the blaster break. I suppose that is that we need do a bigger box and structure the blaster with some reinforcement like a metallic mesh.
ATTENTION
When we finished the blaster mold is necessary to dry it. The best way is to leave it inside an oven for 4. ~ 5 hours at 120 degrees Celsius. Rather let it dry for another three or four days.
One problem with lead is spilling splash that can be violent, with the mold dry it decreases considerably.
Be careful when pouring the lead. Protect your body with cloth, at least.


Hola, estoy construllendo un rg 65 y me gustaria saber donde puedo comprar material para hacer las velas, le agradeceria su colaboración, gracias de antemano.
Salut, Je construis un RG65 et je voudrais savoir où je peux acheter du matériel pour fabriquer des bougies, je vous serais reconnaissant de votre aide, merci d’avance.
Você pode usar o papel poliéster para desenho técnico, ou o mylar que também é um poliéster.
Abraço
Fred
Pingback: Footy Radio Station | AFL Footy Tipping
Fred boa tarde,voce pode me ensinar a usar a tabela offset,estou tentando fazer os moldes de uma canoa canadense,sei que butt é a medida do fundo,wl é a medida onde vai se formar o bojo da canoa,minha duvida é uma linha em diagonal do desenho que sai da linha de centro e vai em direção ao bojo ,como eu faço esta medida.se puder me ajudar fico muito agradecido.
sem mais jOSE
José, seria interessante se eu pudesse dar uma olhada nesta tabela offset. Normalmente estas tabelas representam pontos em 3D, no entanto elas se apresentam de várias maneiras diferentes, por isso sem vê-la não posso te ajudar. Você pode escanear a tabela ou copiar uma parte num editor de texto e salvar como arquivo de texto e enviar para o meu e-mail.
Abração
Fred
Hi Fred,
I am planning on building an IOM & am wondering how you join the planking to the Transverse sections. or do you glue the planking together?
The above picture looks like they are pinned at each section?
Thanks for the info.
Stan
Stan
This picture is a RG 65, normally the RG 65 do not need have much transverse sections attached definitively to the hull and in the most RG 65 forms we have none attached, and is usual protect the transverse sections with a tape to not glue in the planking and here we need the pins to give the form to the planking.
In this figure he do the hull to be a form for a fiberglass mold and by this reason he attached all the transverse frames to the hull and the pins are only to aid the adhesion between planking and frame.
The absence of the frames inside hull facilitate fiberglass the internal planking part.
For IOM I think that we need have some frames attached to planking, but if we have much, the weight of the boat is compromised.
Then we can attach definitively some frames and others not and in this case, we need the pins to give the form to the planking.
What I do is use CA glue to fix the planking together and in the frames that will stay and after I remove the frames that do not stay definitively and fiberglass the hull with epoxy internally only and taking the opportunity to strengthen the attachment between frame and planking with epoxy glue. But I use always pins to aid the adhesion between planking and frame but some peoples use also elastics and others ways to not do holes in the planking.
Cheers
Fred
hello
do you have a film from the “rc-spinnaker” or any other subject?
because I want to build one!
thanks and greetings from switzerland
swissTOM
Hi Thomas
The AMYA magazine Model Yachting has a web edition that show some spinnaker details, I am sending a copy to you by e-mail .
Thanks, cheers,
Fred
Pingback: 2010 in review |